Sunday, November 29, 2009

Cupcake Inspiration Challenge #35

I've finally gotten up enough nerve to play along this week.  I cannot believe that anyone would seriously eat this cupcake!


This is just so great! I love snowmen, so that's what my first card is from.


The DP is  something that I got out of a bin, and I'm not sure of the company - if I was guessing, it might be Graphics 45.  The edges are distressed and I backed it with SU! Chocolate Chip.

The snowman is actually a rub-on from the glass crafting section of Michael's.  Looks equally great on kraft paper.

The sentiment is Inkadinkadoo, embossed in SU! Chocolate Chip.


This second card was inspired by the color scheme of silver and blue. 

The DP is Basic Grey from my Mistletoe and Pear pad.  It's backed with SU! Night of Navy.

The stamp is a very old holly stamp that my mother gave me ages ago.  I seem to use it every year in a new way.  This year I embossed it with Stampendous! EP in Sapphire pearl. 

For bling, I added some crystal Stickles to the berries and silver pearls to the corners.

Happy holidays, everyone!  Thanks for letting me play!


Wednesday, November 25, 2009

Happy Thanksgiving!

Today I've put together my perfect version of the fabled cornicopia (horn-of-plenty for the less pretencious).  Below are just some of the reasons I like to shop for craft "supplies" at antique stores.  I especially love the ones that are consignment stores with lots of boothes.   My favorite finds:


Yards of velvet ribbon and lace for less than a dollar per card.
Grab bags of buttons (I love coming home and sorting them).
And a jar full of random small charms and decorations - one price for the whole jar. And you get a really cool jar too!

Hope you all have a wonderful holiday weekend surrounded by people you love, great football, and too much food!

Wednesday, November 18, 2009

Flock Together

I seem to have a thing for birds lately.  Or maybe it's just the super cool Inkadinkadoo stamp set of birds.
This little guy came with the set and I've been waiting for the mood to strike me so I could use it.  The tree branch stamps in white ink are also from another Inkadinkadoo set of branches.  There's something about white on kraft that really appeals to me.


The nifty letter stickers are from Making Memories and caught my eye because they're very shiny.  Some simple pale green satin ribbon pulled things together.  If you click on the pic you'll see the gold bead accents on the owl's tummy and eyes.  That extra shine really pops!

Hope you're having a great week.  Thanks for visiting!

Monday, November 16, 2009

Birds of a Feather

Is anyone else feeling a little bummed what with the gloomy, windy weather and all?  Me too!  So, with a little help from Inkadinkadoo, here's some brightness for your day.


I got happy with the sapphire embossing powder and my cardstock scraps. The text paper is from a vintage French textbook that I found at an antique store and inked with white ink. A little dollar-bin bling and I was smiling again.


Thanks for stopping by!


Friday, November 13, 2009

Coffee Time!

I am just super proud of these cards. 

I have these paper towels in the kitchen.  Ever since I put them out, I've been trying to figure out how I could use the cute designs in a card.  The problem is that paper towels are pretty fragile.  It's tough to use adhesive with them.  So, I tried a few things that didn't work.  Then I hit on something that did.  I decopaged the cut out designs onto heavy white cardboard (I cut up a mailer box with a smooth finish).  I used Diamond Glaze as the glue.  The cardboard didn't ripple, and the result was a hard, matte, pebbled finish.  It feels like plaster and looks a bit like those sugar things you use to decorate cakes.

The ribbon is brown velvet that I got at an antique store in Sisters.  I just love how these turned out.  So, if you have weird things around the house just begging to be put on cards - go for it!

Sunday, November 8, 2009

Thinking of Treats

Aimee is making holiday treats.  Lots of yummy desserts and candy.  Which, I think, subconsciously inspired this card.

What you can't see very well in the pic is the layers.  I took two strips of Basic Grey "Bittersweet" and cut the top around the designs.  I placed one slightly higher than the other.  The both layers are popped up with foam dots.  Behind the DP is a layer of lace CS from KI Memories.  At the very back is some lavendar CS that I embossed with flowers.  I got all that done, and decided it just needed a little "something" else.  That's when I got out my stash of metal word stickers from the $1 bins, and the "giggle" one seemed just right.
What a nice relief from the holiday stuff!  Thanks for stopping by.

Saturday, November 7, 2009

Non-Holiday Fun

Thought I'd take a short break from the holiday stuff and show you some cards I did for Father's day this year.  These are pretty typical of my "normal" style.


The card with the buttons was a little difficult to photograph.  The background paper is handmade gold foil on black, very shiny.  The buttons came from various antique store grab bags.  The card with the stars has a vintage film strip attached.  The card with the leaves has natural raw wool fibers - washed but not twisted into yarn.  All of these are typical of the kind of thing I enjoy.  My craft area is full of embellishments that come from just about everywhere.  I don't stick to the scrapping area of the craft store.  Antique stores are wonderful places!  I can always find grab bags of weird items. 

Friday, November 6, 2009

This One's for Michelle

Michelle told me that she loves this card.  Personally, I think it's the felt that's got her all giddy :)


This was a simple card to make.  I used StampinUp! White Naturals paper in my Cuttlebug with the snowflake embossing folder.  The sentiment came from an Inkadinkadoo set and I embossed it with opaque gold tinsel powder.

The felt ornaments are from Creative Impressions.  I found them at Ben Franklin in Springfield, OR.   They have lots of things that I haven't found here in Portland.

I've put a pic of the whole set of felt.  Five each of six designs.  What's shown in the card, plus the four others that I haven't done up yet.


They're not adhesive, so you have to use glue on them.  I used a little Tacky Glue with a small paintbrush.

Are you sick of holiday cards yet?  I am.  I just got an order from a friend for 10 all-occasion cards, so I get to go back to doing one-of-a-kind for awhile.  I'll start posting them as I get them done.  Wouldn't want us to be all hum-buggy before Thanksgiving even gets here!

Take care and visit again soon.

Thursday, November 5, 2009

I Love Inkadinkadoo


I just love this card.  Not because it's necessarily my best work, but because it came together like kizmet.  My mom had this cool stamp from Inkadinkadoo.  I had this old Basic Grey paper pad (Mistletoe and Pear).  Can you see how the deer look almost identical?  And, I had my favorite Old Olive CS from StampinUp!

A little Sakura Stardust pen, some silver beads, and ta!da!

Oh, and I had lots of fun making a mess with the distressing tool :)  Why did it take me so long to discover that little doohickey?


I'm kind-of on a green thing today.  But, had to show you another Inkadinkadoo stamp.  Does this not look like something from Dr Seuss?  Whoville must be missing a tree!  The background is handmade paper from Creative Papers (link on the sidebar).  It's really thick and the impression is deep, so lots of texture.  I used it with StampinUp! Chocolate Chip CS and pigment ink.  Some $1 bin bling and stardust markers.  Very, very easy card.

All this whimsy and detail are why Inkadinkadoo is currently my favorite stamp co.

Wednesday, November 4, 2009

What Else Is Paper Good For?

I told you all in an earlier post that I love paper.  Here's something I did that isn't a card.


I have a teensy weensy addiction to handmade paper.  There's a link in the sidebar to Creative Papers.  They have the most wonderful paper ever!  100s of different materials, designs and colors from all over the world.

I bought some samples of Japanese paper.  Samples because the big sheets are $7.50 each.  Using DG3 craft glaze, I attached the paper to the back of a glass tile.  I found some nice ones on Etsy that are flat on the back, and rounded on the front.  No sharp edges.  It took several coats of glaze on the back, drying in between for at least 24 hours.  Then I attached a sterling silver bail, also from Etsy.

I've made a bunch of different ones and they're really fun.  It's a nice break from cards, and a good way to use scraps.  This also works with DP and book pages.

Thanks for visiting!

Tuesday, November 3, 2009

Photo Cards

Hey everyone.  My good friend Aimee was curious about how I use photos in my cards.  So, I thought I'd post some that I've done over time.  The best photos for cards that I've ever taken always seem to come from our trips to Arizona to visit Jim's parents.  All that sun makes for cool pics.


The top two cards are pictures from Arizona.  The bottom two are from the indoor gardens in Golden Gate Park, and the Carousel there too.  For craft shows, I generally just do a straight-up photo card like the one with the butterflies.  The others are ones that I've given to friends and family.

The Tower of Holiday Power

Every year, a group of friends who make their own cards gets together for a weekend in the fall.  Ostensibly to make our holiday cards.  There is also usually a little drinking, a lot of eating, and bouts of "hunting and gathering" at the craft stores.  No husbands and no kids.  We gather at one person's house and stay up until all hours of the night crafting.  It's a tradition.

Sadly, this year schedules did not allow us all to get together.  So, I packed up my crates of swag (ahem, supplies) and headed to my parents' house in Eugene.  Mom and I commandeered the kitchen island and set to work.  Carrying on the tradition on our own.  Not as rowdy as the usual crowd, but still super fun.

So, how many cards can I make in an uninterrupted weekend?

Thirteen sets of 6 = 78
Allowing for "hunting and gathering", eating, minimal sleep...a total of about 16 hours of work.  Not bad.  Now, I am preparing them for the craft show on Saturday, and I have to label and sign each card.  Plus all the other goodies I'm selling.  That part isn't as fun.

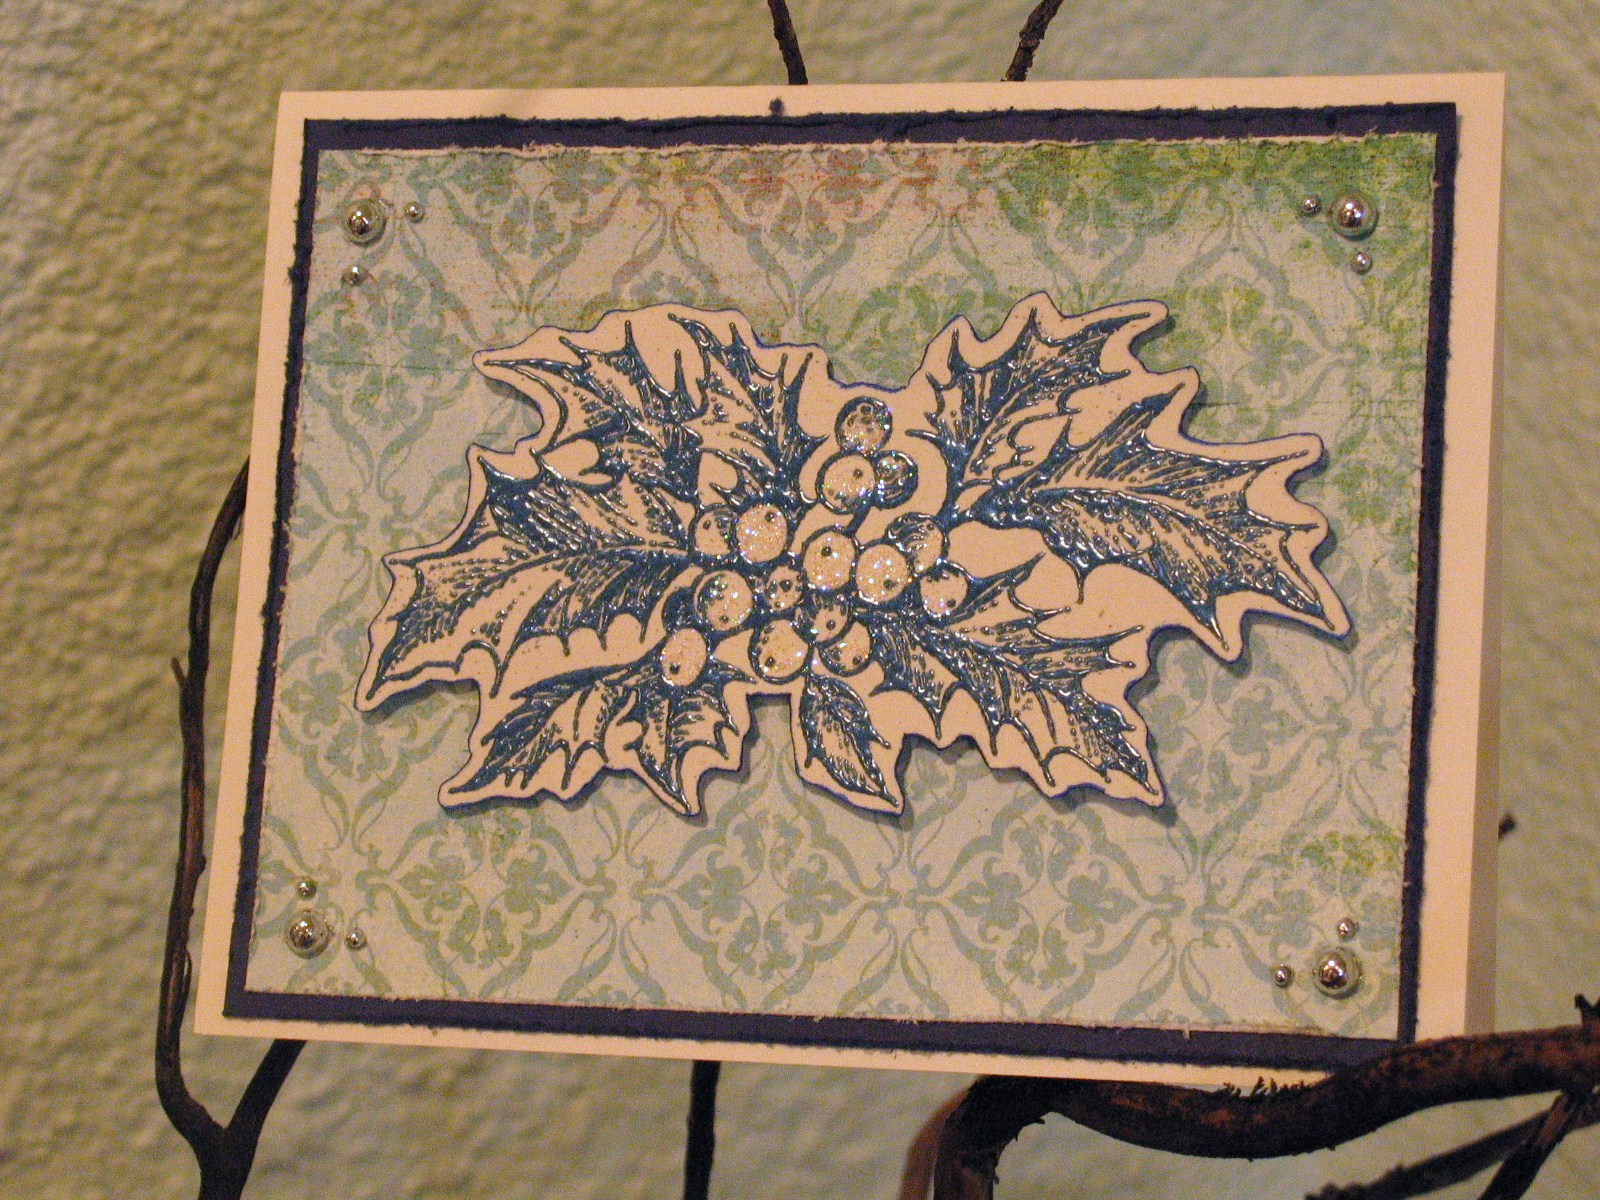
Here's a close-up look at one of the card sets:


Be sure to click on this pic to see some of the details.  I cased the layout from my friend Michelle, who I think cased it from someone else.  This is a great use of random found stuff.  DP scraps, charms from a grab bag that I got at an antique store, cute crocheted snowflakes that used to be gift tags, and some gold bling from the discount bin at Michael's.

Sorry the pics are less than ideal.  I'm still searching for that perfect spot in my house to photograph my cards.  We have very little natural light, so it's a challenge.  If any of you have good ideas about how to get great photos, let me know.

Happy crafting!

Monday, November 2, 2009

Hip Happening, November 7th - Crafty, Gifty Goodness


Hey there!  I'm so excited that Dylanbug is going to have a booth at Hip Happening this Saturday.  It's a great craft and art show with very creative vendors, good food, and of course coffee (my favorite thing next to air).

I'm going to have holiday card sets, gift tag sets, and pendants.  I'll also have a few all-occasion cards, but not as many as usual because I've been concentrating on holiday stuff.

Here are some "teasers" for you:
     If you're free on Saturday, come on out to Sellwood and get some early holiday shopping done.  And keep me company - it gets lonely in the booth sometimes ;)

Sunday, November 1, 2009

The Inaugural Post

Hello everyone!  Welcome to Dylanbug's first post.  Since I'm in holiday card mode - getting ready for Hip Happening on November 7th - I've decided to post some of the cards I've made so far.  A couple today and more in the days to follow.

Just a warning, I'm posting just to show people things, and I'm not always that great about writing down the "recipe" as I'm making things.  So many things I use have come from discount bins, or are scraps from my DP stash.  I am completely addicted to paper as you'll find out soon enough!


This little guy is part of a set that I made.  There are three different snowmen.  He's a rub-on that I found in the glass crafting area of Michael's.  The sentiment stamp came from the $1 bin at Craft Warehouse - I borrowed it from my mom, so I'm not sure of the company.  The DP is also from Michael's, and wouldn't you know it, I forgot to look at the vendor before I cut it up!

The colors on this one are really neat, the brown and aqua are not your typical holiday scheme, which I like.


Next up, some really neat gift tags.  I looked high and low for a holly punch and couldn't find one anywhere.  Then I stopped by my favorite local art store - Collage - and what do you know, they had a nifty punch by McGill.

I used my StampinUp! scalloped oval punch with some Target $1 striped DP, then punched the holly.  I backed it with oval-punched forest green CS from Michael's.  I topped it off with some Christmas Red Stickles for the berries.  Very easy!